- 除了漸層字、紋理字,常見的字體效果還有立體字與陰影字。
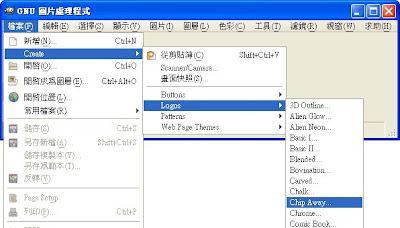
- 立體字,可在許多地方看到它的蹤影,有些 Script-Fu 產生的標誌是立體字,例如,Chip Away。
- 執行 [影像] / 檔案 / Create / Logos / Chip Away

- 由圖層面版可觀察「Chip Away」字體的圖層結構。
- 「Chip Away」字體共有三個圖層
- 一個圖層放置凹凸貼圖(Bump Map)濾鏡所產生的立體字
- 一個圖層放置字的陰影
- 一個圖層當背景

- 凹凸貼圖濾鏡位於「濾鏡 / 映射 / 凹凸貼圖」選單內,此濾鏡可製造立體的感覺,立體字多與此濾鏡有關。
- 以下測試凹凸貼圖濾鏡的 Azimuth 參數, Azimuth 可譯為「方位角」。
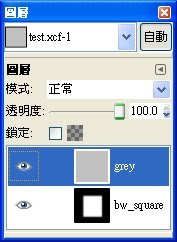
- test.xcf 有兩個圖層
- grey 圖層是全灰的圖案
- bw_square 圖層是外圍黑中間白的圖案
 grey圖層 |  bw_square圖層 |
- 再來,要對 grey 圖層製作立體的效果。先確定在圖層面版內已選取 grey 圖層。

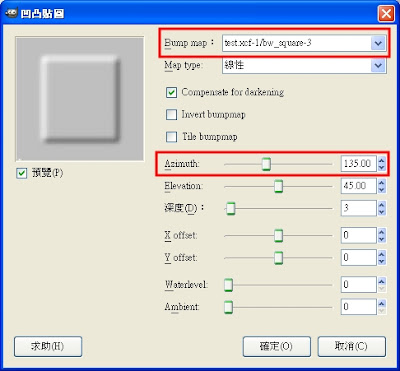
- 點選影像視窗,執行[影像] / 濾鏡 / 映射 / 凹凸貼圖 【註1】 , 參數採用預設值。
- 「凹凸貼圖」的英文是「Bump Map」,而此濾鏡的第一個參數也是「Bump map」。
- 在下圖的對話盒,選擇了「bw_square 圖層」作為映射圖,映射圖決定了「grey 圖層」的凹陷與凸起。
- Azimuth 預設為135,光源在左上方,因此右下方有黑邊的陰影。

- 凹凸貼圖濾鏡是以右方作為方位角0度,上方為90度。
- 若光源在上方,則陰影會在下方。
- 若光源在左上方(方位角135度),則陰影會出現在右下方(方位角315度)。
- 以下試驗不同方位角的凹凸效果,列出八個角度的結果圖。


選單及項目名稱的英文:
【註1】 [Image] / Filters / Map / Bump Map
- 接續前面的練習操作,改用 Python-Fu 自動化操作的流程。
# 圖片的尺寸
width = 154
height = 149
# 顏色的設定
white = (255, 255, 255)
black = (0, 0, 0)
grey = (192, 192, 192)

img = pdb.gimp_image_new(width, height, RGB)
square = pdb.gimp_layer_new(img, width, height, RGB_IMAGE, "bw_square", 100, NORMAL_MODE)
pdb.gimp_image_add_layer(img, square, 0)

# 準備好新的影像、新的圖層,並顯示影像
pdb.gimp_display_new(img)

# bw_square 圖層,是外圍黑、中間白的圖案
pdb.gimp_context_set_foreground(black)
pdb.gimp_edit_fill(grey_layer, FOREGROUND_FILL)

pdb.gimp_selection_all(img)
pdb.gimp_selection_shrink(img, 27)
pdb.gimp_context_set_background(white)
pdb.gimp_edit_fill(square, BACKGROUND_FILL)
pdb.gimp_selection_none(img)

# grey 圖層,是全灰的圖案
grey_layer = pdb.gimp_layer_new(img, width, height, RGBA_IMAGE, "grey", 100, NORMAL_MODE)
pdb.gimp_image_add_layer(img, grey_layer, -1)
pdb.gimp_context_set_foreground(grey)
pdb.gimp_edit_fill(grey_layer, FOREGROUND_FILL)

blur_radius = 10
pdb.plug_in_gauss_iir(img, square, blur_radius, 1, 1)

# 若光源在左上方(方位角135度),
# 則陰影會出現在右下方(方位角315度)。
Azimuth = 135
pdb.plug_in_bump_map(img, grey_layer, square, Azimuth, 45, 3, 0, 0, 0, 0, TRUE, FALSE, 0)
# 可試試不同的方位角
- 啟動 GIMP Python Console
- 將前面的程式碼,全部選取、複製、再貼到 Python Console 提示符號 >>> 之後,按下 Enter 。
- 過一會,就會看到凹凸效果,如下圖所示。


