裝扮一下又何妨
- 在圖片中,常須要為圖片加上一些文字說明。
 文字工具按鈕,功能雖然陽春,但可達到大部份的要求,若要寫黃色的字,只要將前景色改變成黃色。
- 只是若想為文字穿上一身五顏六色的夢幻彩衣,該如何做呢?
先要有字體,才能裝扮
- 新增一張大小為256x128背景為白色的圖片。
- 將該圖存為 text.xcf 檔,XCF為GIMP的原生檔案格式,支援多圖層的功能。
- 單擊工具按鈕中文字按鈕,點一下text.xcf視窗的作圖區域,出現「GIMP文字編輯器」。在文字編輯器內,鍵入 Hello! 。

- 字型 設為 Sans Bold ,此為粗體字型
- 大小 設為 72

- 移動文字圖層,將 Hello! 字樣放在適當的地方。
- 這是黑色的 Hello! ,不是彩色的。

所有運算,只作用在黑色的字體上
- 現在,圖層面版內,有兩個圖層,「Hello!」文字圖層與「背景」圖層。
- 選取「Hello!」文字圖層,勾選「鎖定」項目,讓透明色版不受影響。
- 之後,在文字圖層上,所有運算,將只作用在有顏色的地方。
- 透明的部份,將不會有任何反應。

Land 1的漸層字
- 點一下text.xcf圖片的左側的中間。
- 按住滑鼠左鍵,在text.xcf圖片上,由左至右拉一條直線。
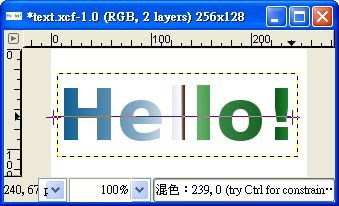
- 放開滑鼠左鍵,Hello! 字樣變成漸層字。
- 下圖為Land 1的漸層字。

其它效果的漸層字
- 在混色工具的選項面版內,混色用的漸層,可設為「前景色至背景色(RGB)」。
- 如此設定,依據前景色與背景色的設定,可製作出不同顏色漸變的字體。
- 在工具箱視窗內,雙擊前景色(與背景色)的設定按鈕,設定色彩鮮豔的前景色與背景色。
- 同樣地,在text.xcf圖片視窗內,由左至右拉一條直線。
- 放開滑鼠左鍵,Hello! 字樣變成「前景色至背景色」的漸層字。

熱帶島嶼的風格
- 也可由上至下,拉一條直線。
- 下圖為Caribbean Blues的漸層字。

等價的 Python-Fu 程式碼
- 接續前面的練習操作,改用 Python-Fu 自動化字體的生成流程。
- 下面的程式碼,分成三大部份:
- 首先,要準備好新的影像、新的圖層。
- pdb.gimp_text_fontname(...) 寫上粗體字的 Hello!
- pdb.gimp_blend(...) 產生漸層的效果。
# Part 1.
# 圖片的尺寸
width = 256
height = 128
# 前景色設為黑色,背景色設為白色
black = (0, 0, 0)
white = (255, 255, 255)

img = pdb.gimp_image_new(width, height, RGB)
bg_layer = pdb.gimp_layer_new(img, width, height, RGB_IMAGE, "背景顏色", 100, NORMAL_MODE)
pdb.gimp_image_add_layer(img, bg_layer, 0)
pdb.gimp_context_set_background(white)
pdb.gimp_edit_fill(bg_layer, BACKGROUND_FILL)

pdb.gimp_display_new(img)
# Part 2.
string = "Hello!"
font_size = 72
#font = "Sans Bold" # 竟然沒有粗體字的效果
font = "DejaVu Sans Bold"
# 測試環境為 Ubuntu 11.10
# 需注意你所使用的作業系統有無 "DejaVu Sans Bold" 字型

text_ext = pdb.gimp_text_get_extents_fontname(string, font_size, PIXELS, font)
text_width = text_ext[0]
text_height= text_ext[1]
# 將 Hello! 字樣放在適當的地方
text_offx = width/2 - text_width/2
text_offy = height/2 - text_height/2

text_layer = pdb.gimp_layer_new(img, width, height, RGBA_IMAGE, "Hello!", 100, NORMAL_MODE)
pdb.gimp_image_add_layer(img, text_layer, 0)

pdb.gimp_context_set_foreground(black)
tmp_layer = pdb.gimp_text_fontname(img, text_layer, text_width, text_height ,string, 0, TRUE, font_size, PIXELS, font)
pdb.gimp_layer_set_offsets(tmp_layer, text_offx, text_offy)
pdb.gimp_floating_sel_anchor(tmp_layer)
# Part 3.
# 所有運算,只作用在黑色的字體上
# 這一行是重要的關鍵
pdb.gimp_layer_set_lock_alpha(text_layer, TRUE)

# 可試試不同的漸層效果
#gradient_name = "Land 1"
gradient_name = "Caribbean Blues"

pdb.gimp_context_set_gradient(gradient_name)
offset =0 ;repeat = REPEAT_NONE;reverse = FALSE;
supersample = FALSE ; max_depth = 0 ; threshold = 0;
dither = TRUE ;

# 可試試不同的漸層起始點與終點對字體的影響
#x1 = 0; y1 = height/2; x2 = width; y2 = height/2 # 相當於由左至右拉一條直線
x1 = width/2; y1 = 0; x2 = width/2; y2 = height - text_offy # 相當於由上至下拉一條直線

pdb.gimp_blend(text_layer, CUSTOM_MODE, NORMAL_MODE, GRADIENT_LINEAR, 100, offset, repeat, reverse, supersample, max_depth, threshold, dither, x1, y1, x2, y2)

pdb.gimp_selection_none(img)
- 啟動 GIMP Python Console
- 將前面的程式碼,依次序,全部選取、複製、再貼到 Python Console 提示符號 >>> 之後,按下 Enter 。
- 過一會,就會看到 Caribbean Blues 漸層字,如下圖所示。


